GE self-cleaning ovens utilize high temperatures to efficiently eliminate baked-on food residue, offering convenience and reducing manual scrubbing efforts for homeowners.
These ovens, detailed in manuals like the GE Profile JGSP48WHWW, provide a streamlined cleaning process, ensuring a sparkling kitchen with minimal intervention.
Understanding Self-Cleaning Technology
GE self-cleaning ovens employ a pyrolytic cleaning process, reaching extremely high temperatures – often exceeding 880°F (470°C) – to incinerate food soils. This intense heat transforms grease and food particles into a fine ash residue.
As outlined in GE appliance manuals, including those for models like the JGSP48WHWW, the self-clean cycle effectively eliminates the need for harsh chemical cleaners. The process is automated, requiring minimal user interaction beyond initiating the cycle and allowing for proper cool-down.
It’s crucial to understand that this technology isn’t a substitute for regular, light cleaning; it’s designed for periodic deep cleaning of accumulated grime.
Safety Precautions Before Self-Cleaning
GE oven manuals strongly advise against forcing the latch handle during the self-clean cycle, as this can damage the door lock mechanism. Prior to initiating the cycle, ensure the oven vent remains unobstructed to prevent overheating and ensure proper airflow.
Critically, GE emphasizes protecting birds, as fumes released during self-cleaning can be harmful to avian respiratory systems – relocate them to a well-ventilated area. Never use oven cleaners in a self-cleaning oven.
Always remove all racks and accessories, and wipe up any loose debris before starting the cycle, as detailed in the GE appliance instructions.

Preparing Your Oven for the Self-Clean Cycle
GE manuals instruct users to remove oven racks and accessories before initiating the self-clean cycle, and to wipe up any loose soil or debris inside.
Removing Oven Racks and Accessories
GE appliance manuals consistently emphasize the crucial step of removing oven racks and all accessories before starting the self-clean cycle. This precaution prevents potential damage to these items from the extremely high temperatures reached during cleaning.
Racks can discolor or warp, and accessories may be compromised. It’s important to consult your specific model’s manual (like the GE Profile JGSP48WHWW) for detailed rack removal instructions, as designs can vary. Ensure the oven interior is completely clear of any cookware, baking stones, or thermometers.
Proper preparation safeguards both your oven and its components, ensuring optimal self-cleaning performance.
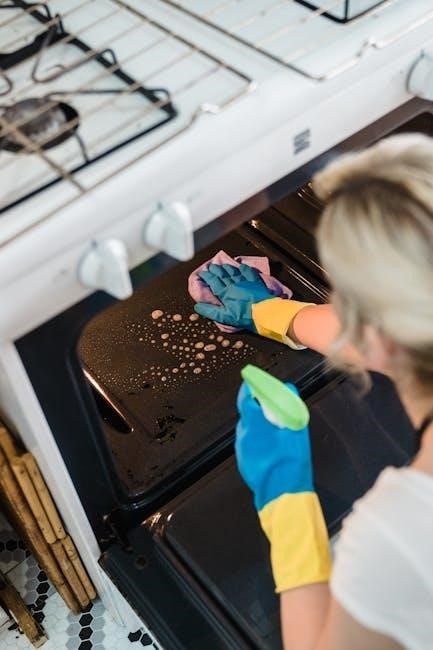
Wiping Up Loose Soil and Debris
GE self-cleaning oven instructions, as found in manuals like the GE Profile JGSP48WHWW, strongly recommend wiping up loose soil and food debris from the oven’s bottom before initiating the self-clean cycle. This simple step significantly enhances cleaning effectiveness and minimizes smoke production.
Large food particles can smolder and create unpleasant odors. While the high heat will burn away most residue, removing excess debris reduces the overall cleaning time and prevents potential issues. A quick wipe-down with a damp cloth is all that’s needed for optimal results.
Ensuring Proper Ventilation
GE self-cleaning oven manuals, including those for models like the JGSP48WHWW, emphasize the importance of proper ventilation during the self-clean cycle. This is crucial for dissipating odors and preventing potential indoor air quality concerns.
Open windows in the kitchen and activate the range hood fan to create cross-ventilation. The self-clean cycle generates high temperatures that can release fumes. Adequate airflow minimizes these smells and ensures a comfortable environment. GE also advises moving birds to a well-ventilated room, as they are particularly sensitive to these fumes.

Initiating the Self-Clean Cycle
GE oven manuals instruct users to select the “Self-Clean” option on the control panel, set the desired cleaning duration, and ensure the door locks securely.
Proper control settings, as outlined in guides like the JGSP48WHWW, are vital for a successful self-cleaning process.
Selecting the Self-Clean Cycle Option
GE appliance manuals clearly detail how to activate the self-clean cycle. Typically, this involves pressing a dedicated “Self-Clean” button on the oven’s control panel. Some models may require you to first press a “Clean” or “Self-Clean” key, then use the up/down arrows to specifically choose the “Self-Clean” function.
The GE Profile JGSP48WHWW manual emphasizes confirming the oven door is closed before initiating. The control panel will then guide you through setting the cleaning duration, often offering options for light, medium, or heavy soil levels. Ensure the selected option aligns with the oven’s condition for optimal results.
Refer to your specific model’s manual for precise instructions, as button layouts and menu options can vary.
Setting the Cleaning Duration
GE self-clean cycles offer adjustable durations to accommodate varying levels of oven soil. After selecting the “Self-Clean” option, the control panel will prompt you to set the cleaning time. Options typically range from 2 to 4 hours, with longer durations for heavily soiled ovens.
The GE instruction manual advises choosing a shorter cycle for lighter cleaning needs, potentially saving energy. Models like the JCBS250, JCBS280, and JCBS630 may have pre-programmed settings.
Always consult your specific model’s manual for recommended durations and to understand how the selected time impacts the cleaning process. Accurate time setting ensures effective soil removal without unnecessary energy consumption.
Locking the Oven Door
GE self-cleaning ovens automatically lock the door for safety during the high-temperature cycle. This feature prevents accidental opening while the oven reaches extreme heat. The GE manual explicitly states the door must be fully closed and controls correctly set for the cycle to initiate.
Never force the latch handle; doing so can damage the locking mechanism. The locking process is automatic, and attempting to override it is unsafe.
The door remains locked until the oven cools sufficiently, indicated by the control panel. Attempting to open it prematurely could result in severe burns. Refer to your model’s manual for specific unlocking instructions.

During the Self-Clean Cycle
GE ovens reach incredibly high temperatures during self-cleaning, burning away food soils. Expect potential odors and some smoke; proper ventilation is crucial for a safe experience.
Understanding Oven Temperatures
GE self-clean cycles operate at extremely high temperatures, typically exceeding 880°F (471°C). This intense heat is specifically designed to pyrolyze – or burn off – food residue within the oven cavity.
The GE instruction manual emphasizes that these temperatures are significantly higher than those used during normal baking or roasting. This is why it’s crucial to remove all items from the oven before initiating the cycle.
The high heat ensures thorough cleaning, but also necessitates strict adherence to safety precautions, including keeping children and pets away from the oven during operation. The oven door automatically locks to prevent accidental opening during this process.
Potential Odors and Smoke
GE oven manuals acknowledge that some odor and smoke production is normal during the self-clean cycle. This is a result of the high temperatures breaking down food particles. The intensity can vary depending on the amount of soil present in the oven.
However, excessive smoke or unusually strong odors may indicate a problem. Ensure proper ventilation by opening windows or using a range hood. The GE documentation advises moving birds to a well-ventilated room, as they are particularly sensitive to fumes.
If smoke persists or becomes alarming, immediately stop the cycle and consult the troubleshooting section of your oven’s manual.
Avoiding Oven Use During Cleaning
GE self-clean oven instruction manuals emphatically state that the oven should not be used during the self-clean cycle. The extremely high temperatures reached during cleaning pose a safety risk and can damage the oven’s components if interrupted.
Attempting to open the door mid-cycle is also strongly discouraged, as the locking mechanism is designed to prevent access during operation. The GE documentation highlights that the door must remain closed for the cycle to function correctly and safely.
Any interruption could lead to incomplete cleaning or potential hazards.

After the Self-Clean Cycle
GE manuals advise allowing the oven to cool completely before wiping away any ash residue with a damp cloth, and then carefully inspect the door seal.
Allowing the Oven to Cool
GE appliance manuals strongly emphasize the importance of allowing the oven to cool completely after the self-clean cycle concludes. Do not attempt to open the oven door immediately, as internal temperatures remain extremely high, posing a significant burn risk.
The cooling process can take several hours, depending on the cycle duration and model. Patience is crucial. Attempting to force the door open can damage the locking mechanism, as noted in various GE guides.
Once cool, carefully check for any lingering heat before proceeding to wipe away the resulting ash residue. This ensures both safety and prevents potential damage to the oven’s interior surfaces.
Wiping Away Ash Residue
After the oven has fully cooled, a fine layer of ash will remain. This is a normal byproduct of the self-clean cycle, representing the burned-off food soils. Use a damp cloth or sponge to gently wipe away this residue from all interior surfaces – the oven bottom, walls, and door;
Avoid abrasive cleaners or scouring pads, as these can scratch the oven’s enamel coating. A mild dish soap solution can be used for stubborn spots. Ensure all ash is removed before using the oven again, as any remaining particles could affect future cooking results.
Checking the Oven Seal
GE recommends inspecting the oven door gasket after each self-clean cycle. This seal is crucial for maintaining proper oven temperature and preventing heat loss during cooking. Carefully examine the gasket for any signs of damage, such as cracks, tears, or hardening.
A compromised gasket can lead to inefficient heating and potentially affect the self-clean cycle’s performance. Do not clean the gasket, as it contains fiberglass; however, if damage is observed, contact GE Appliances for a replacement to ensure optimal oven functionality and safety.
Troubleshooting Common Issues
GE self-clean ovens may encounter issues like door locking failures or premature cycle stops; avoid forcing the latch, and ensure correct control settings.
Oven Door Won’t Lock
If the oven door fails to lock, preventing the self-clean cycle from initiating, first verify that the door is completely closed. GE manuals emphasize never forcing the latch handle, as this can damage the locking mechanism. Ensure all controls are correctly set for the cycle.
A common cause is debris obstructing the latch area; carefully inspect and remove any obstructions. If the issue persists, consult the GE appliance support website or your owner’s manual for specific troubleshooting steps related to your model (like JCBS250, JCBS280, or JCBS630). Attempting to bypass the lock is dangerous and voids the warranty.
Cycle Stops Prematurely
If the self-clean cycle halts before completion, a power interruption is the most likely cause. Check your home’s circuit breaker or fuse box to ensure the oven receives consistent power. Another potential issue is excessive smoke or odor triggering a safety shut-off.
Ensure proper ventilation during the cycle, as outlined in the GE appliance manual. If power is stable and ventilation is adequate, consult the manual for model-specific error codes or contact GE customer support. Do not attempt to restart the cycle immediately; allow the oven to cool first.
Excessive Smoke or Odor
Excessive smoke and odor during the self-clean cycle are normal, especially with significant food buildup. However, unusually strong smells or dense smoke indicate a problem. Ensure you’ve removed oven racks and large debris beforehand, as per the GE appliance instructions.
Proper ventilation is crucial; open windows or use a range hood. If the odor persists or smoke becomes excessive, the cycle may automatically pause as a safety measure. Refer to your model’s manual (like JGSP48WHWW) for troubleshooting, and avoid oven use until the issue is resolved.

Maintaining Your GE Self-Cleaning Oven
Regular cleaning between self-clean cycles, utilizing Cerama Bryte for the cooktop, and avoiding aluminum foil lining are key to optimal oven performance and longevity.
Regular Cleaning Between Cycles
GE recommends wiping up spills immediately and performing routine cleaning to minimize buildup requiring the self-clean cycle. This extends the oven’s lifespan and maintains peak performance.
Focus on removing grease, as excessive grease can impact the self-clean function’s effectiveness. The GE instruction manual emphasizes keeping the oven vent unobstructed for proper airflow during both regular cooking and self-cleaning.
Avoid abrasive cleaners that could damage the oven’s interior surfaces. A damp cloth with mild dish soap is generally sufficient for everyday cleaning needs, ensuring a consistently clean cooking environment.
Cooktop Cleaning (Cerama Bryte)
GE specifically recommends Cerama Bryte cleaning pads for maintaining the shine and integrity of glass cooktops. Always ensure the cooktop is completely cool before cleaning to prevent burns and product damage.
Apply Cerama Bryte with gentle pressure, following the circular motions outlined in the GE appliance manual. This effectively removes spills, stains, and cooked-on food residue without scratching the surface.
After cleaning, wipe the cooktop with a clean, damp cloth to remove any remaining residue. Regular use of Cerama Bryte preserves the cooktop’s appearance and ensures optimal heating performance.
Avoiding Aluminum Foil Use
GE strongly advises against using aluminum foil to line the oven bottom, as outlined in appliance manuals; Foil can trap heat or reflect it unevenly, potentially causing damage to the oven or creating a safety hazard, like shocking the user.
This trapped heat can disrupt the oven’s temperature regulation, impacting cooking results. Furthermore, foil can scratch the oven’s interior surfaces during the self-clean cycle or regular use.
Instead of foil, GE recommends utilizing oven-safe cookware and regularly cleaning the oven to prevent food buildup. Following these guidelines ensures optimal performance and longevity.
Specific Model Considerations
GE offers diverse oven models, including coil top, radiant top, and standard clean versions like JCBS250, JCBS280, and JCBS630, each with unique cleaning features.
Refer to your specific model’s manual for tailored instructions and optimal self-cleaning procedures.
Coil Top and Radiant Top Models
GE coil top and radiant top ovens require careful preparation before initiating the self-clean cycle. The instruction manual emphasizes removing oven racks and any accessories to prevent damage from the intense heat generated during cleaning.
It’s crucial to wipe up any loose debris or large food particles beforehand, as these can create excessive smoke and odors; Always ensure proper ventilation by opening kitchen windows, as the self-cleaning process can release fumes.
GE specifically advises against using aluminum foil on the oven bottom, as it can trap heat and potentially cause a shock or damage the oven. Following these guidelines ensures a safe and effective self-cleaning experience.
Standard Clean Models (JCBS250, JCBS280, JCBS630)
GE standard clean models, including JCBS250, JCBS280, and JCBS630, feature a self-clean cycle designed for convenience. The instruction manual strongly advises against cleaning the oven gasket, as it contains fiberglass and is not intended for cleaning.
Prior to self-cleaning, remove all racks and accessories. It’s vital to ensure the oven door can lock properly; never force the latch handle, as this can damage the locking mechanism.
Protect birds by moving them to a well-ventilated room, as the fumes released during the cycle can be harmful. Proper preparation ensures a safe and effective cleaning process for these GE models.

Important Reminders
GE manuals emphasize keeping the oven vent unobstructed and free of grease buildup for optimal performance. Avoid using aluminum foil on the oven bottom.
Remember to protect birds and never attempt to force the oven door latch during the self-clean cycle.
Keeping Oven Vent Unobstructed
GE appliance manuals consistently highlight the critical importance of maintaining a clear oven vent. This vent, typically located in the back of the oven, is essential for proper airflow during the self-clean cycle and regular baking operations.
An obstructed vent can lead to overheating, potentially damaging the oven or creating a fire hazard. Grease buildup is a common culprit, so regular inspection and cleaning are vital. The manual advises against allowing grease to accumulate, as it restricts airflow and compromises the oven’s efficiency.
Ensure nothing blocks the vent opening, and periodically wipe it down to remove any accumulated residue. A clear vent ensures safe and effective oven performance.
Avoiding Gasket Cleaning
GE self-cleaning oven instruction manuals specifically advise against cleaning the oven door gasket. This component, made of fiberglass, is designed to maintain a tight seal during the high-temperature self-clean cycle, and cleaning it can compromise its integrity.
The gasket’s material is sensitive, and abrasive cleaners or excessive handling can cause it to deteriorate, leading to heat loss and an ineffective seal. Maintaining the gasket’s original condition is crucial for safe and efficient oven operation.
Avoid applying any cleaning agents to the gasket; simply leave it undisturbed to ensure optimal performance and longevity of your GE oven.
Protecting Birds During Cleaning
GE self-cleaning oven manuals emphasize the critical importance of protecting birds during the self-clean cycle. The process releases fumes that, while safe for humans with proper ventilation, are highly toxic to avian species.
These fumes can cause severe respiratory distress and even be fatal to birds. Therefore, it is imperative to move any caged or free-roaming birds to a completely different, well-ventilated room before initiating the self-clean function.
Ensure the bird’s new location remains sealed off until the oven has completely cooled and all fumes have dissipated, safeguarding their health and well-being.